

What to expect after air duct cleaning is a system with loosened debris captured by a vacuum, registers put back in place, and HVAC operation checked before the technician leaves. Replace the air filter within 24 hours. Running the fan without heating or cooling for about 24 hours can help move remaining particles toward the filter.
It’s reasonable to expect an immediate change in airflow or less dust, but signs of thorough work matter more than a promised result. Check that vents are clear, airflow feels consistent from room to room, and no unusual dust or debris appears around registers.
This guide explains how technicians use negative pressure to remove debris, what equipment or treatments may be involved, and what to inspect afterward. You’ll also learn what to do if dust settles, airflow seems uneven, or anything around the HVAC system looks out of place.
Key Takeaways
- Negative pressure directs loosened debris into collection equipment, helping keep it from spreading through the home.
- After service, replace the HVAC filter within 24 hours and check that airflow feels consistent from room to room.
- Chemical sprays or deodorizing treatments should only be used with your prior approval; mechanical cleaning is the primary method.
- Run the HVAC fan without heating or cooling for about 24 hours, then vacuum and dust 1-2 days after cleaning.
- Pay attention to dust around registers and changes in airflow. These signs can help you spot an area that needs follow-up.
Inspection, negative pressure, and debris removal
A thorough cleaning starts with inspecting accessible ductwork and identifying where dust or debris has collected. Technicians then use negative pressure to draw loosened material into vacuum equipment instead of letting it spread through your rooms.
Inspection and Debris Removal
Cleaning involves assessing accessible HVAC areas and physically extracting contaminants from the system. This matters because dislodging dust without capturing it can leave debris behind or send it into living spaces.
A complete cleaning covers supply and return ducts, registers, grilles, and main trunk lines. Technicians remove and clean registers and grilles, then reinstall them. They may also clean accessible components such as blower compartments, which can help prevent accumulated debris from reentering the ducts.
Negative pressure directs airflow toward the vacuum collection point. As cleaning tools loosen material inside a duct, the vacuum draws it inward. This containment step helps limit dust dispersal around the home, including near heating and cooling vents.
Cleaning only one contaminated component can leave other areas as sources of renewed buildup. The U.S. Environmental Protection Agency notes that an uncleaned component in a contaminated system can re-contaminate the entire system. The inspection helps identify connected areas that need attention.
Source Removal and Vent Grates
Source removal means physically extracting contaminants from duct surfaces, rather than simply stirring them into the air. If a provider describes the work as NADCA-certified source removal, ask which areas the quoted service covers.
Vent grates, also called registers or grilles, are typically removed for cleaning and reinstalled afterward. This gives technicians access to the openings and lets them clean the grates themselves. Check that each one is back in place and isn’t loose or blocked.
Expect noise while the vacuum and cleaning tools operate. Open vents and loud machinery can disturb pets, so keep them in another area before work begins. Clearing access to registers and the HVAC unit also helps technicians reach the system without moving household items.
If inspection reveals a visible air leak, a technician may correct it if the repair is manageable. A severe leak may need a return visit or specialized HVAC repair. In regions like Central Florida, established providers such as Happy Home HVAC Solutions can help homeowners address duct leaks and restore balanced airflow. Ask for a clear explanation of the leak’s location and whether the cleaning is complete.
Checking airflow and registers after service
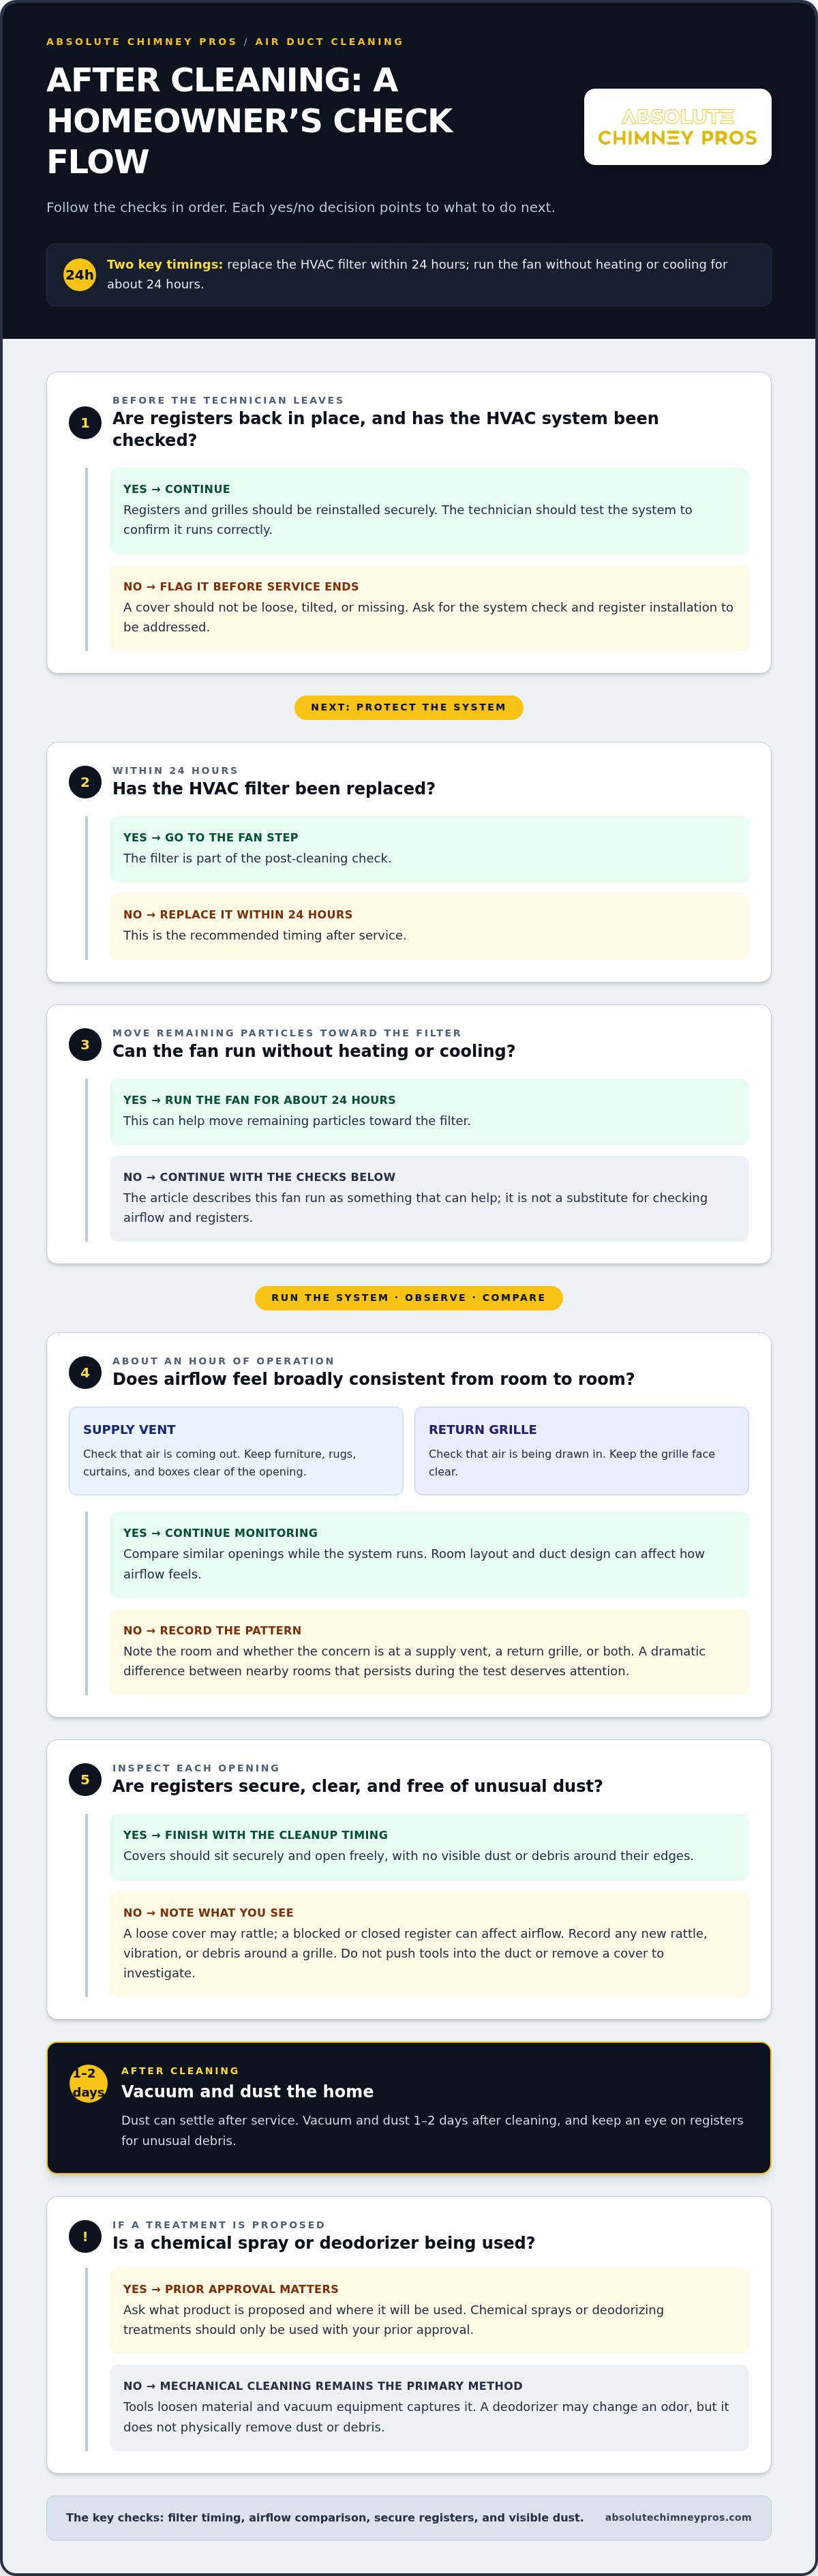
Before leaving, a technician should test the HVAC system to confirm it runs correctly. Afterward, run it for about an hour and compare airflow across rooms. Check supply vents for air coming out and return grilles for air being drawn in. These openings serve different purposes, so assess each accordingly.
Start with rooms that felt noticeably different before cleaning. Stand near a supply register in the living room, then compare it with one in a bedroom. Airflow should feel broadly consistent, though room layout and duct design can affect it. A dramatic difference between nearby rooms deserves attention, especially if it persists during the test.
Check each register and grille, too. Technicians remove, clean, and reinstall these covers during service. Make sure each one sits securely, opens freely, and has no visible dust or debris around its edges. A loose cover can rattle when the system runs. A blocked or closed register can also affect airflow in that room.
- Supply vents: Make sure furniture, rugs, curtains, and boxes don’t cover the opening.
- Return grilles: Keep their faces clear so indoor air can flow back toward the HVAC system.
- Registers: Check that covers are aligned and attached, not tilted or partly detached.
- Room-to-room flow: Compare similar openings while the system runs, rather than judging one vent alone.
Move a chair or storage box away from a vent to see whether an obstruction was limiting airflow. Keep the space around supply and return openings clear. A register hidden behind furniture may seem weak even when the duct itself is unobstructed.
If airflow remains uneven after the hour-long test, note the room and opening involved. Record whether the issue affects a supply vent, a return grille, or both. These details help describe the pattern and distinguish a single-room concern from a broader change across the home. When persistent imbalances point to deeper mechanical or ductwork issues, homeowners can turn to experienced HVAC professionals such as B&B Air Conditioning & Heating Service to inspect and balance the system.
Watch for changes beyond airflow. A register that vibrates, a new rattle when heating starts, or debris appearing around a grille gives you a specific observation to report. Don’t push tools into the duct or remove a cover to investigate. Use the system’s normal operation and the visible condition of each opening as your reference.
Use of chemicals or deodorizing treatments
The main risks are applying chemicals without your prior approval or relying on them instead of removing contaminants. Poorly contained cleaning can also let loosened debris enter living spaces, while an uncleaned contaminated component can recontaminate the system.
Air duct cleaning primarily uses mechanical methods. Tools loosen material from duct surfaces, and vacuum equipment captures it. A deodorizing product may change an odor, but it doesn’t physically remove the dust or debris causing it. That distinction matters if the odor comes from inside the HVAC system.
The U.S. Environmental Protection Agency says cleaning sprays are unnecessary in ductwork unless mold issues are present. The agency also expresses skepticism about chemical biocides used in ducts. This makes the reason for any proposed treatment important. A general promise to “freshen” the system isn’t the same as identifying a specific problem.
Before a chemical cleaning product is sprayed into your ducts, the technician should get your prior approval. Ask what product is proposed, where it will be applied, and why mechanical cleaning alone isn’t being used. You can also ask whether the treatment addresses a diagnosed condition or simply adds fragrance. These questions help you understand the work before it starts.
- Mechanical cleaning: Ask how the process removes contaminants, rather than simply masking an odor.
- Proposed spray: Review the product and intended location before giving approval.
- Mold concern: Ask what visible evidence prompted the treatment and which area it targets.
- Odor after service: Note where it is strongest and whether it changes when the HVAC system runs.
A noticeable scent after service doesn’t prove the ducts are clean. A neutral smell doesn’t prove every contaminated component was addressed, either. The work should focus on conditions observed during inspection, such as visible debris or a specific area of concern.
Improper cleaning can create another problem if equipment stirs up contaminants without capturing them. Negative pressure directs loosened material toward the vacuum, helping prevent debris from entering rooms. Incomplete work matters, too: the U.S. Environmental Protection Agency warns that leaving a contaminated system component uncleaned can lead to recontamination.
If you notice a new odor or residue after treatment, record where it appears and when. For example, note whether it comes from one register or several after the system starts. Share your observations promptly with the service provider, and don’t add another spray to mask the smell. Identifying the source is more useful than layering fragrances over it.
Be wary of a vague promise to “freshen” the system, a spray proposed without a specific diagnosed reason, or treatment offered instead of mechanical contaminant removal. Other warning signs include applying chemicals without your approval, allowing loosened debris into living spaces, or leaving a contaminated component uncleaned. Ask what product will be used, where, and why.
Vacuuming and dusting after service
Plan to vacuum and dust 1-2 days after air duct cleaning, when settled particles can be collected from household surfaces. This is a practical follow-up, not a sign that the cleaning failed. A small amount of dust may come from ordinary indoor activity, open doors, or items brought inside.
Clean from higher surfaces toward the floor. Dust shelves, tables, window ledges, and other flat surfaces first, then vacuum nearby flooring. This helps capture particles that fall while dusting. In a bedroom, for example, clean a dresser before vacuuming around the bed and under accessible furniture.
Vacuum rugs and carpets, where settled dust may be less visible than on a hard floor. Move light chairs or baskets to reach underneath. For hard flooring, use the vacuum attachment or floor setting suited to the surface. Avoid pushing dust toward supply registers or return grilles while cleaning.
Pay attention to the area around each vent. Wipe the register face and nearby trim with a clean cloth, then vacuum the floor below it. If you find a concentrated pile of debris at one opening, take a photo and note the room. A specific observation is more useful than repeatedly wiping the same spot without tracking it.
- First pass: Dust upper surfaces, such as shelves and cabinet tops.
- Second pass: Wipe tables, window ledges, and register surrounds.
- Final pass: Vacuum carpets, rugs, and floors, including accessible edges.
One cleaning pass after 1-2 days is a sensible starting point. Repeat only where visible dust remains, such as a rug beside a frequently used doorway. Frequent dusting may still be needed in homes with pets, open windows, or heavy foot traffic. Those sources can bring particles indoors regardless of duct cleaning.
Watch the pattern over the next few days. A light layer across several surfaces differs from a steady stream of debris appearing at one register. If dust repeatedly gathers near the same opening after you’ve cleaned it, record the room and timing. This can help distinguish ordinary household dust from a concern that deserves follow-up.
Don’t use a household vacuum inside duct openings. The equipment and access are different, and reaching into a duct can disturb material without capturing it. Limit cleanup to exposed surfaces, floor coverings, and register faces. If you notice damage, a loose cover, or persistent debris, leave the duct untouched and report what you observed.
How long does dust settle after air duct cleaning?
Dust can settle on household surfaces after service, so plan to vacuum and dust 1-2 days later. That timing gives airborne particles an opportunity to settle before you clean. It isn’t a countdown to a perfectly dust-free home. Everyday activity can continue to bring particles indoors.
For about 24 hours after cleaning, run the HVAC fan without heating or cooling. This circulates air through the system without adding heat or cooling. The filter can capture particles moving through the airflow. Replace the air filter within 24 hours after service, then run the fan as recommended.
Dust doesn’t settle at the same rate in every room. Air movement, open doors, foot traffic, and household activity affect where particles collect. For example, dust near a frequently used entryway may come from shoes and movement through the home. A surface beside a supply register may collect particles carried by airflow.
After 1-2 days, clean from high surfaces toward the floor. Wipe shelves, tables, and window ledges first. Then vacuum rugs, carpets, and hard floors. This order collects particles that fall during dusting instead of leaving them on a freshly vacuumed floor.
- Filter: Replace it within 24 hours after cleaning.
- Fan: Run it without heating or cooling for about 24 hours.
- Surfaces: Dust and vacuum 1-2 days after service.
- Pattern: Note whether dust appears across rooms or repeatedly near one register.
A light film across several surfaces after a day or two can come from ordinary household dust. Repeated debris at the same register is a more specific observation. Note the room, the time since cleaning, and whether the HVAC fan was running. Those details help describe what changed without guessing at the cause.
If dust keeps appearing, check simple sources first. Look for a filter that needs changing, a supply vent near a dusty rug, or a return grille blocked by household items. Keep vents clear. Don’t reach into ductwork or use a household vacuum inside an opening, as this can disturb material without capturing it.
If something seems off after service, contact the cleaning company within 72 hours. Describe the location and what you observed, such as recurring dust around one register. For a home that needs professional duct cleaning, schedule air duct cleaning to address buildup inside the system.
Absolute Chimney Pros: Chimney Sweep
Absolute Chimney Pros provides chimney sweeping for homeowners who need maintenance beyond their air duct system. Duct cleaning addresses HVAC ductwork; a chimney sweep focuses on the chimney. If you notice soot around the fireplace, visible buildup, or have concerns about the chimney’s condition, an inspection can help assess what needs attention. If inspection identifies a damaged liner or another issue, chimney liner installation or chimney repair may be the relevant next step. These are separate systems, but both matter to home maintenance. Contact Absolute Chimney Pros to discuss chimney sweeping or an inspection for your home.
Keep Your Home’s Systems in View
Knowing what to expect after air duct cleaning gives you a clearer baseline for noticing changes around your home. Use those observations to guide routine maintenance rather than treating one service as a solution for every system. Keep a simple maintenance note with the area affected, what you observed, and when it happened. This record can help you spot recurring concerns and explain them clearly when arranging service.
If your attention turns to the fireplace, soot, visible wear, or questions about the chimney call for a separate assessment. An inspection can show whether sweeping, repair, or liner installation is the relevant next step. Absolute Chimney Pros provides chimney sweeping, inspections, repairs, and liner installation for homeowners.
For chimney care, contact Absolute Chimney Pros to discuss the service that fits your home. A clear note and a practical next step can make ongoing home maintenance easier to manage.
Frequently Asked Questions
How Long Does the Process Take?
An appointment usually takes four hours or less, depending on the home’s size. The number of vents, duct layout, and contamination also affect how long the work takes. A home with many registers or a complicated system can need more attention than a smaller, simpler layout. Allow time for the technician to inspect the system and complete the work without rushing.
Will my technician spray cleaning products?
Not without your prior approval. Mechanical cleaning is the primary method, and sprays aren’t routinely required. If a treatment is proposed, ask what product will be used, where it will go, and what condition it addresses. For example, a fragrance intended to mask an odor doesn’t remove its source. Understand the reason for any chemical application before agreeing to it.
What should you expect during and immediately after air duct cleaning?
Expect equipment noise and technicians working at registers and accessible HVAC areas. Keep pets in another room, and move small items away from vents before work begins. Afterward, check the rooms where equipment was set up for displaced items or visible debris. In New Jersey and the Philadelphia area, note unusual changes specific to your home, such as a new rattle when the system starts.
How long does air duct cleaning take for a typical home?
Residential appointments commonly take four to six hours, though the home’s layout and condition affect the timing. A compact system with accessible registers differs from one with complex duct runs or heavy buildup. Ask for an expected work window based on your home’s size, register count, and system configuration. This helps you plan around equipment noise and access to the HVAC unit.
What changes in airflow, dust, or odors should you notice after cleaning?
To better understand what to expect after air duct cleaning, compare the same rooms under similar system settings. A room with a previously blocked register may feel different once the opening is clear, while persistent odors can point to a source outside the ducts. If an odor appears only when heating starts, record that detail rather than covering it with fragrance.
How can you tell if air ducts were cleaned properly?
Look for evidence that the work addressed the system, not just the visible vent covers. The scope should include supply and return ducts, registers, grilles, and main trunk lines. Check that registers are back in place and the system runs normally. A clear description of completed areas helps you understand what was cleaned and identify any excluded or inaccessible components.
Should you replace HVAC filters or clean vents after air duct cleaning?
Replace the HVAC filter within 24 hours after service. Clean exposed register faces and surrounding surfaces, but don’t reach tools into duct openings. Check the replacement filter’s dimensions and fit against the existing filter slot before installation. A poorly seated filter can leave gaps around its edges, so make sure it rests securely and doesn’t obstruct the filter compartment.


